Fallout: New Vegas - Lone Sniper Guide
This is a guide for players who prefer not to get their hands dirty when it comes to combat, instead picking off their enemies from as far away as possible. A significant amount of combat in Fallout: New Vegas will be outdoors, and the easiest way to dispatch an enemy in that situation is before they even know you're there, so we're going to be snipers.
The stat based progression system in Fallout: New Vegas rewards a specialised approach to character building, so concentrating heavily on GUNS and SNEAK related skills is the most straight-forward path to success. With that in mind, on the occasions (inside hotels, installations etc) where sniping isn't the most practical solution we'll either be blowing enemies away with shotguns or killing them with sneak critical melee attacks.
This guide assumes that you have the Ultimate Edition, are not playing on hardcore mode, will not be using companions, and aren't interested in using the V.A.T.S. system of combat.
S.P.E.C.I.A.L. ATTRIBUTES
At the start of the game you'll be asked to enter your desired attribute stats into Doc Mitchell's Vigor Tester, and although you'll have a lot of points to distribute between your seven attributes (40 in total), the game is designed in such a way as to prevent you from being able to cover every base, and hit your statistical targets too soon. Starting with the following stats is ideal for a GUNS based character who will be sniping wherever possible:
STRENGTH (7)
Governs: Melee Weapons. Also determines Inventory carry weight and large weapon usage
Although this character is not designed for melee combat you may find yourself using melee weapons during the first few levels of the game, before your GUNS skill is high enough to be really useful, and later in the game for groups of fast moving enemies, so a decent amount of Strength is desirable for that purpose. More weight allowance is a consideration, but it shouldn't be a deciding factor here. What is the deciding factor is the weapon handling requirements. A Strength rating of 6 is required to use the SNIPER RIFLE, and 7 to use the RIOT SHOTGUN later in the game. So with an initial Strength rating of 7 you'll be free to use your weapon of choice as soon as you have the skill points to do so, and once you get the Strength implant you'll be well placed to switch to melee whenever the occasion warrants.
PERCEPTION (5)
Governs: Energy Weapons, Lockpick, Explosives. Also determines compass range
This is one of the more controversial attributes, as the in-game text is rather misleading. Your Perception score does not in fact affect weapon accuracy in any way, so outside of increasing your base Lockpick score (which you want to get to 50 as soon as is practical because 'Average' locks are the most common type in the game) there are only two reasons to put points into Perception: To increase the distance at which your compass registers enemies, and to gain access to perks. You'd be forgiven for assuming that more distant enemy detection would be very handy for a sniper, but in fact the increased enemy detection range is questionable - oftentimes when sniping you're much farther away from your target than the compass could ever detect, even if your PER score were maxed at 10, and when you're in more enclosed environments the compass is rather redundant as you'll be watching for enemies in the actual gamespace instead. So that just leaves perk requirements. A Perception score of 6 is required in order to access the BETTER CRITICALS perk at level 16 - one of the best perks in the game for this build, so a starting score of 5 means that you'll be covered for that once you get the PER implant. However, you can increase your effective Perception rating to 7 if you're willing to forego armoured headgear in favour of civilian hats, as most of them grant +1 PER when worn. Better still, get BOONE'S 1ST RECON BERET, which in addition to the +1 PER also gives a +5% CRITICAL HIT chance, and never degrades.
ENDURANCE (7)
Governs: Unarmed, Survival. Also determines environmental resistances (poison, radiation), hit points and number of implants allowed
Much more useful in hardcore mode, but still very useful in normal mode. The most important feature of having a high Endurance score is the increased number of Hit Points (health) you have. More HP is a good idea for any combat oriented character for obvious reasons, but less so for a long range specialist. A starting score of 7 will give you 240 HP - a healthy amount. You'll also have 30% poison resistance (Cazadores are the most annoying enemies in the game), and 14% Radiation resistance. A starting score of 7 means you can install seven implants: STRENGTH, PERCEPTION, ENDURANCE, INTELLIGENCE, AGILITY, LUCK and once you're flush with funds your choice of either the SUB-DERMAL ARMOR, or the MONOCYTE BREEDER because why not? A starting Endurance rating of 7 also means that once you've installed the Endurance implant your Endurance will be 8, and that is the requirement for the level 22 perk IRRADIATED BEAUTY, which removes all radiation whenever you sleep in a bed.
CHARISMA (1)
Governs: Speech, Barter. Also determines companion nerve
Every point put into Charisma is a point wasted in this build. You may be thinking that there must be some sort of downside to setting one of your attributes as low as it will go, but you can relax because there really isn't. The game normally offers combat or lockpick solutions on those rare occasions when SPEECH is an issue, and any quests that don't can be delayed until you have higher speech without impeding your overall progress. BARTER would be an issue if it were difficult to make money in this game but it's not, so it's not, and Companion nerve is not relevant to a lone wanderer. Do yourself a favour and leave Charisma at 1.
INTELLIGENCE* (3)
Governs: Medicine, Science, Repair. Also determines available skill points each level
Unlike Charisma, Intelligence is not entirely useless for a sniper, as it governs REPAIR, which is essential to the success of this build. You'd do well to have Repair at 50 as soon as possible so that you can make your own WEAPON REPAIR KITS. This is especially important as the Sniper Rifle you'll be acquiring early in the game is pretty beat up, and it costs a fortune to pay for NPCs to repair it. You'll be using it a lot throughout the game as well so degradation is an issue. However, with an initial INT score of 3, the SKILLED trait and Repair as one of your three 'Tag' skills your starting Repair score will be high enough so that when you reach level 2 you'll be able to take the LIGHT TOUCH perk (requires Repair 45), so 50 shouldn't be a problem.
Intelligence also governs SCIENCE, which comes in handy for a few quests, and helps with hacking computer terminals (although oftentimes there's an alternative to hacking that will yield the same results). Having said that, there's no need to sacrifice points from other more important attributes in order to boost Intelligence past the bare minimum. After all you're a sniper, not a nuclear physicist.
AGILITY (8)
Governs: Guns, Sneak. Also determines draw and reload speed, and Action Point regeneration in VATS
Setting your Agility to 8 and taking the SMALL FRAME trait at the start of the game gives you good starting bonuses to both the GUNS and SNEAK skills, and allows you to max the attribute itself as soon as you get the Agility implant. The SNEAK skill could be a factor for many snipers depending on play style, but the main reason for having such a high Agility rating is for the bonuses to the GUNS skill. You'll be wanting to use the sniper rifle out in the open whenever practical, and you need a Guns score of at least 75 for that. In addition the sway of your weapon while aiming through a scope is reduced the higher your GUNS score, so maxing it out as soon as possible is very desirable, and even more so because 100 is also the point at which you'll be able to wield the awesome Riot Shotgun.
The Action Point Regeneration bonus in VATS is not relevant for this build, as snipers are not generally going to be using VATS.
LUCK (9)
Governs: All skills, but to a lesser degree. Also affects gambling, and determines critical hit chance
The most important aspect of this attribute for the purposes of the sniper is that each point of Luck increases the critical hit chance by 1%, so a Luck score of 10 will equal a 10% chance of a critical hit. Nice. A very high Luck rating also has a significant positive effect on gambling - especially BLACKJACK.
*A Note on Intelligence
A lot of guides will tell you to get your Intelligence right up to 10 as soon as possible because of the skill point allocation increase it confers every time you level up thereafter, but that's a really bad value proposition; you have to allocate 2 of your precious SPECIAL points into Intelligence at the start of the game in order to recieve a single extra skill point every second level (allocating 1 point into Intelligence will only confer the extra skill point every fourth level, so your INT rating should ideally be an even number). Also, Intelligence is generally under-utilised in Fallout New Vegas, so unless you're going whole hog with a completely pacifist build 4 is the sweet spot; quite a few perks and checks require an INT rating of 4 - the EDUCATED perk for example - and very few require more than 4, and those that do are not worth picking. With that in mind you can set Intelligence to 3 as long as you make sure you install the Intelligence implant as early as possible (as an added bonus, with a base INT score of 3 you'll get a pity discount for the INT implant). Once you hit level 4 and take the Educated perk, you'll receive 14 skill points each level thereafter, which is more than enough for this build. Realistically only a half dozen or so skills really matter to a sniper, and focusing on so few you'll be able to max them out fairly quickly.
IMPLANTS
There are a total of nine implants available at the New Vegas Medical Clinic - one for each of the seven S.P.E.C.I.A.L. attributes, plus the SUB-DERMAL ARMOR and the MONOCYTE BREEDER. Once fitted an implant will permanently boost your score for that attribute by 1, and each attribute is capped at 10. It is therefore unnecessary to raise any attribute past 9 at the beginning of the game. The number of implants your body can take is tied to your ENDURANCE rating, so if you wanted to get all nine implants you would need a starting Endurance of 9. However, that would be a fool's errand, as three of the nine implants are surplus to requirements; both the Sub-Dermal Armor Implant and the Monocyte Breeder are luxury items, and spending 4000 caps on the Charisma implant is akin to setting the money on fire.
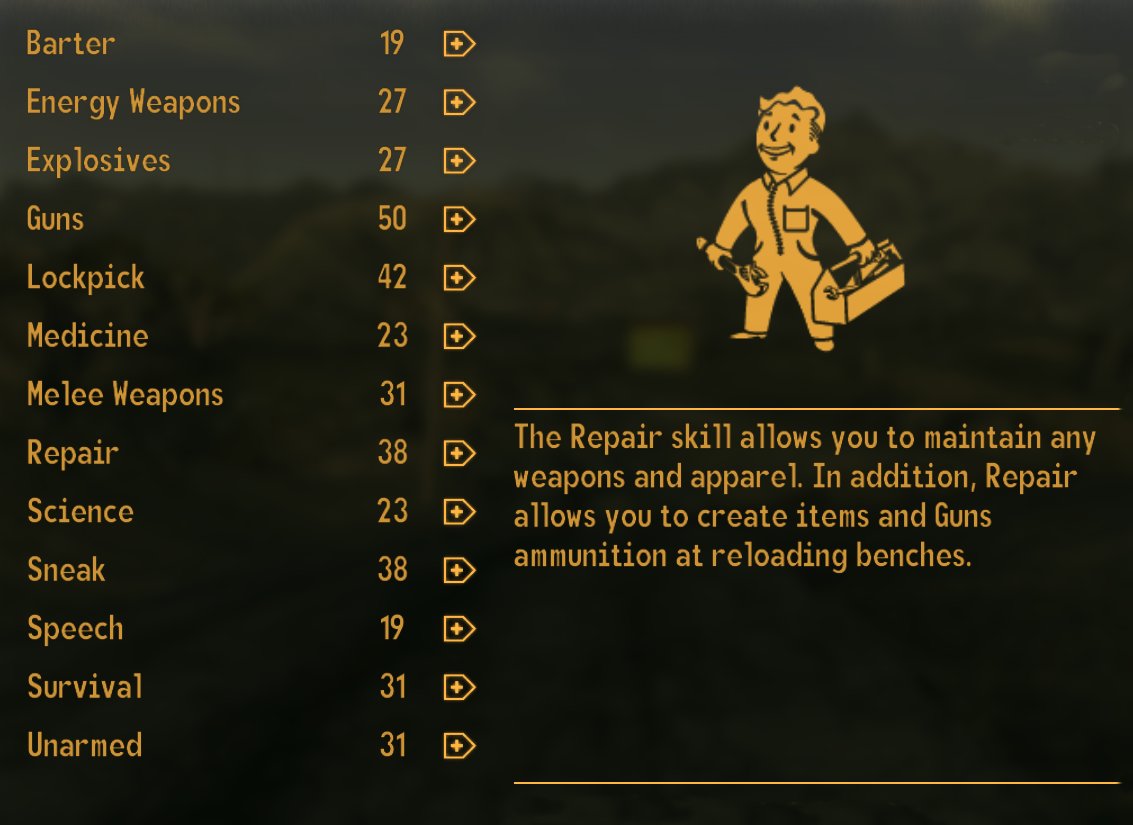
SKILLS
There are 13 skills in the game and each of them is governed by a S.P.E.C.I.A.L. attribute, but only five of them are of interest to a sniper, of which three in particular form the core of their abilities: AGILITY, LUCK and PERCEPTION. Agility and Luck will be maxed as soon as you buy the respective implants, and Perception will settle at a very reasonable 7 once you get Boone's beret. Both STRENGTH and ENDURANCE will end up at a very respectable 8. With these stats you'll be able to use the most appropriate weapons for a GUNS based character, and can take any relevant perks at the most appropriate time. The following list details which of the sniper's five key skills are governed by which attribute and a recommended target to be reached as soon as possible for your primary skills (highlighted in bold) and secondary skills (blue):
GUNS - Governed by Agility. Primary Targets: 75 for the Sniper Rifle, 100 for the Riot Shotgun
REPAIR - Governed by Intelligence. Primary Targets: 50 to be able to make Weapon Repair Kits, 90 for JURY RIGGING
SNEAK - Governed by Agility. Primary Target: 50 to get improved holdout weapons (such as the SLEEPYTYME SMG) into casinos
LOCKPICK - Governed by Perception. Primary Target: 50 for 'Average' locks
SCIENCE - Governed by Intelligence. Primary Target: 30 to reprogram Primm Slim to be the new sheriff of Primm
The starting value of each of these skills can be deduced from the values of your S.P.E.C.I.A.L. attributes by using the following formula:
2 + (2 x Governing Attribute Score) + (0.5 x LUCK, rounded up).
Once you reach 50 LOCKPICK and 50 REPAIR switch all points into GUNS until you reach 100, then concentrate mainly on REPAIR so that you can hit 90 by level 14 for JURY RIGGING. After that you can distribute your points as the quests you find yourself on dictate. It will be useful to have your LOCKPICK score at 90 as soon as is practical, because at that point you'll be able to pick 'Very Hard' locks with the help of a Locksmith's Reader skill magazine. You can max out Lockpick a little later as there really aren't that many 'Very Hard' locks in the game, and you'll probably have accumulated enough skill magazines to leave it at 90 while you boost the likes of Science and Sneak.
PERKS
Every second level you'll have the opportunity to receive a Perk. These perks give you a specific advantage for the rest of the game, and more become available as you progress through your levels of experience. It's important to note that perks become available AFTER you've assigned your skill points, so there's still time to meet some requirements at the last minute. The first two are the most important for this build, as the LIGHT TOUCH perk at level 2 increases your already high Critical Hit chance, and reduces incoming damage significantly when you need it most. The EDUCATED perk at level 4 will result in 2 more skill points to distribute every second level thereafter, compensating somewhat for having such a low Intelligence score. The following is a reasonable perk path to try to stick to:
Level 02 - Light Touch - Requires AGILITY 6, Repair 45
Level 04 - Educated - Requires INTELLIGENCE 4, Must be at least Level 4
Level 06 - Shotgun Surgeon - Requires Guns 45, Must be at least Level 6
Level 08 - Stonewall - Requires STRENGTH 6, ENDURANCE 6, Must be at least Level 8
Level 10 - Finesse - Must be at least Level 10
Level 12 - And Stay Back - Requires Guns 70, Must be at least Level 10
Level 14 - Jury Rigging - Requires Repair 90, Must be at least Level 14
Level 16 - Better Criticals - Requires PERCEPTION 6, LUCK 6, Must be at least Level 16
Level 18 - Silent Running - Requires AGILITY 6, Sneak 50, Must be at least Level 12
Level 20 - Super Slam - Requires STRENGTH 6, Melee Weapons 45, Must be at least Level 8
Level 22 - Irradiated Beauty - Requires ENDURANCE 8, Must be at least Level 22
Level 24 - Ninja - Requires Sneak 80, Melee Weapons 80, Must be at least Level 20
Level 26 - Tunnel Runner - Requires AGILITY 6, Must be at least Level 26
*A Note on The Expansions
Around level 20-24 you should feel comfortable going up against pretty much any enemies the game has to offer and dealing with whatever situation may arise, because you'll be somewhat overpowered, having maximised your character's core strengths, collected the best weapons around, and being flush with ammo. Something to be mindful of at this point however is the extra content that was added to the base game after release. There were four major content expansions for Fallout New Vegas released in the following order: Dead Money, Honest Hearts, Old World Blues and Lonesome Road. If you're intending to play through this content you should do so before triggering the end of the base game, ie before you you set the faction you're siding with in stone, and set in motion the end game events, as once the base game finale is triggered the game ends and you won't be able to play the expansions unless you go back to a previous save or start a new run.
It should be noted that Dead Money - the first expansion for Fallout New Vegas is frustratingly difficult, especially for a guns character, as it features two main enemy types: those that have to be dismembered to stay dead ('ghosts'), and those that cannot be killed at all (holograms). The expansion also features a confusing layout with damage-dealing toxic gas clouds scattered throughout the area that cannot be circumvented. You're stripped of all gear upon entering, and fitted with an explosive collar that severely limits your freedom of movement, and your best shot at coping with the enemies is using unarmed, melee weapons or possibly energy weapons - basically anything but guns. So if you're going to tackle Dead Money with this character you should hold off until you have these skills maxed out and have high survivability (stimpaks are also thin on the ground).
Overview
The immediate goal is to generate as many caps as possible by selling items you start off with and things you scavenge from Doc Mitchell's house and elsewhere on the way to the NEW VEGAS MEDICAL CLINIC, where you'll be purchasing six implants in the first instance. All six will cost 23,000 caps. However, you'll need to visit Mr. House on The Strip before you start buying implants, and you'll need 2000 caps on you in order to pass the credit check allowing you permanent access there. Mr. House resides inside The Lucky 38 casino, and once there you can generate 8,000 caps by selling 4 snowglobes to him. You can then use this money to buy 2 implants (INTELLIGENCE and LUCK). Then you can use the remainder of your reserves to gamble until you have enough to buy the other 4 implants. This can all be done in the first few hours of gameplay if you follow this guide.
Let's get started
The first thing you'll do after you wake up at the start of the game is enter your desired Attribute stats into the Vigor Tester, but not the ones mentioned above. It's a better idea to enter the stats that will net you the most caps trading with Chet at the General Store in Goodsprings, and convincing people to join you in the GHOST TOWN GUNFIGHT quest - so 10 points each to INTELLIGENCE and CHARISMA. This will give you high BARTER and SPEECH stats. 7 to AGILITY for better sneaking and shooting, and 10 for PERCEPTION to pick locks, 1 for all the rest. After you've set your attributes Doc Mitchell will help you pick a set of stats for your 13 skills and you'll be able to boost 3 of them by a further 15 points. Make them SPEECH, BARTER and LOCKPICK. You'll also get to pick 2 Traits. Pick SKILLED and GOOD NATURED.
Before you leave the doc's house you should pick it clean of every item with about a 5:1 caps to weight ratio. Make some drugs or stimpacks at the chemistry station and repair the 9mm sub-machine gun lying on the crate next to it. Remember to take the glasses on the gurney next to the bed you awoke from and the hat from the hat-stand by the door (the hat grants +1 PERCEPTION) then head out. The doc will bid you farewell at the door, give you your Pip-Boy 3000 and a vault suit and send you on your way. And he won't even care that you're away with his only hat.
Goodsprings
As soon as you leave Doc Mitchell's house take a right and head straight for the old schoolhouse. Once inside kill the mantises and loot the schoolhouse of all items - lockpick the safe and take everything it contains, then waddle on down to Chet's to sell all the junk you've collected (basically everything except stimpaks, Rad-Away and your preferred weapon and outfit. Check all the mailboxes on the way there as there are skill magazines in some of them. Most of these won't be of much use to you, so they can be sold, but you'll want to keep a hold of any copies of Locksmith's Reader, Programmer's Digest, Fixin' Things and Meeting People for those occasions when you fall short on a skillcheck. Buy a shovel before you leave Chet's then head up to the graveyard. Loot all the graves and take the snowglobe that's there, and remember to pick up the 'distinctive cigarette butts' lying on the ground by the open grave, then talk to Sunny Smiles at the Prospector Saloon. This will initiate the tutorial. Follow her out to the back of the saloon and shoot the three bottles with the Varmint Rifle she gives you, then accompany her for some gecko hunting. She'll give you a bunch more 5.56mm ammo to do this. Once that's done ask her if there's any way to make a few caps and she'll give you a Locksmith's Reader skill magazine and tell you to go kill the mantis's in the schoolhouse. If you tell her you've already done that she'll tell you to keep the magazine anyway. This will come in handy soon.
Once you've completed the Ghost Town Gunfight quest and squeezed as many caps out of Goodsprings as you can it's time to head out to THE STRIP - by way of the NEW VEGAS MEDICAL CLINIC.
Re-Statting
When you leave Goodsprings you'll be able to reconfigure everything, and for your travels around the Mojave you're going to talk less and kill more so your new stats should look like this:

For your three 'Tag' skills you're going to want to pick:
GUNS - You can't use the Sniper Rifle until you get this to 75
LOCKPICK - A score of 50 is required for 'Average' locks, 75 for 'Hard, 100 for 'Very Hard'
REPAIR - A score of 45 is required for the LIGHT TOUCH trait, and 50 is required to make Weapon Repair Kits
And for your two Traits you're going to pick:
SKILLED: +5 points to every skill, while reducing experience points gained by 10% for the rest of the game*
SMALL FRAME : +1 to AGILITY, limbs receive 25% extra damage
Once you enter the game proper, after re-configuring your stats and picking the three TAG skills and two traits above, your 13 skills should look like this:
* Due to a bug that was never fixed you may actually receive +5 to all skills twice if you take SKILLED before you re-configure your stats and then again after. If you experience this bug then all the skill points will be 5 points more than illustrated above, and you'll only have to put 7 of your 12 points from level 2 into REPAIR to make the 45 requirement for the LIGHT TOUCH perk.
The journey from Cretin To Knucklehead
Leave Goodsprings by heading south. Follow the road until you see a green sign listing directions for Jean, Primm and Las Vegas. You're heading for Las Vegas, so turn left. Keep on the road and don't stop. You'll see a couple of Powder Gangers to your right - just ignore them and keep following the road until you hit the small town of SLOAN. When you arrive, Chomps will warn you of Deathclaws up ahead. Indeed there are. Head across the train tracks to the Lucky 38 billboard then head straight for the tin shack by the yellow crane. Once there save your progress as you're going to be entering deathclaw territory and things could go pear-shaped as you dash through it. Go exactly NE until you hit a road - cross it to the green puddles by the mountain. Cross the puddles then head west up the steep slope towards the Gomorrah billboard, and hug the mountain round to the right until you find yourself on a small ledge with a Gomorroah billboard in front of you, and slightly to your left. From there continue to head NE, all the time hugging the mountain-side on your right. Keep going forward and right, staying as high and right as possible, following the curves of the mountain while going forward until you're out of the deathclaws' range and the mountains fall away, then stop. Looking roughly northward you should see a large building with robots patrolling the perimeter. This is the REPCONN HEADQUARTERS. Get close enough to it so that the name is displayed on your screen then carry on past it still heading north up the road in front of it. If you look at your Pip-Boy you should be very close to the largest North-South main road on the right.
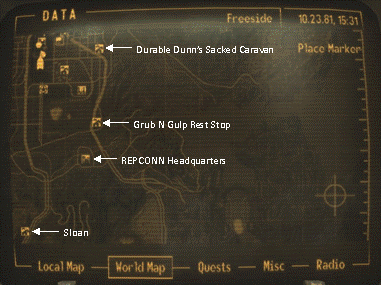
Follow this road northwards until you come across the GRUB N GULP REST STOP, run by Fitz and Lupe. Ask Fitz where you can find a doctor and he'll put a map marker on your Pip-Boy for the New Vegas Medical Clinic. From here you'll want to keep on the road heading north until you find a small wooden bridge that's split into two sections. This is DURABLE DUNN'S SACKED CARAVAN. The dead Van Graff thugs here have very expensive gear to loot. Search the immediate area for more items, then carry on to the New Vegas Clinic using your Pip-Boy as your guide. The clinic is a small squat building with a skull and crossbones spray-painted on one of its windows. When you get close to the door the name will flash up on your screen signaling it's availability for fast travel from now on. You can't afford an implant yet though, so don't go in. Instead head SW to the GUN RUNNERS in order to lighten your load, increase your bank balance and maybe pick up some supplies. From there it's a hop, skip and a jump to The Strip - where you can get 2000 caps for every snowglobe you have. There are another three snowglobes on your way to The Lucky 38; that's 8000 caps that you can use to buy your first two implants before heading out to NOVAC (directly east of the REPCONN Headquarters), in order to get Boone's beret by completing the ONE FOR MY BABY quest. But let's not get ahead of ourselves...
Globetrotting
Time to collect some more snowglobes. Just around the corner from the Gun Runners right side, heading northwards is Freeside East Gate. Inside, Mick & Ralph's will be on your right. Continue past that and take the first right; up ahead you'll see the Old Mormon Fort on the left side of the street - enter the fort. Once inside, turn right immediately and head for the tower in the corner - there's a snowglobe up the stairs inside this tower. Now go back out to Freeside and turn left. Head straight for the blue bus doors at the end of the street and go through them. Once through you should see the King's School of Impersonation on your left, and The Strip is straight ahead. Proceed on up to The Strip, and submit to the credit check - which you will pass if you have more than 2,000 caps. Enter The Strip and you'll be greeted by Victor the Securitron who will urge you to talk with Mr. House in The Lucky 38, which you should agree to right away.
Once inside The Lucky 38 head to the penthouse floor. Sell the Goodsprings and Old Mormon Fort snowglobes to Jane, the female securitron robot then talk to Mr. House but don't commit to anything. Leave him and go back to the securitron robot next to Jane, and pick Cocktail Lounge level from the elevator options. In the middle of the cocktail lounge behind the bar there are three cash registers. There's a snowglobe behind the middle one; take that and head to the penthouse level, and sell it to Jane then head back out to The Strip. You should now have about 8,000 caps - enough for two implants and change. You can go get them right away or you can collect another snowglobe by heading left to Vault 21. Sarah, the vault 21 receptionist has a room next to the one you can rent, and you can use the Skill Magazine Sunny Smiles gave you back at Goodsprings to increase your Lockpick skill to the required 50 to enter her room and collect the snowglobe that's lying on her table.
Time to fast-travel to the clinic. Buy an INTELLIGENCE implant, then one for LUCK. This will cost 7,000 caps and will increase your Intelligence to 4 and max out LUCK - which is good because you'll be gambling in order to parlay your remaining balance into enough caps to buy the other four implants on your shopping list. BLACKJACK is the way to rack up the money in the first instance. First, hit the ATOMIC WRANGLER in Freeside, where you'll be banned from gambling once you win 5000 caps. If you really want to maximise your profits then once you're near the casino's win limit switch to SLOTS for the chance to win significantly more than the limit imposed by each casino, as Slots have a bigger single payout potential. Once you've bled the Atomic Wrangler dry slide on over to the GOMORRAH casino on The Strip, where you'll be banned at 9,000 winnings, then the TOPS, where you'll be banned at 10,000. You can go to the Ultra Luxe and win another 15,000 before they ban you but really at this point you should have more money than you know what to do with. Before you start all this gambling though there's one last piece of business to take care of - your weapon of choice, and there happens to be a free one not too far from where you are right now...
WEAPONS*
Of the vast array of guns on offer in Fallout New Vegas there are three that you should be aiming for with this build:
THE SNIPER RIFLE
Being a sniper it goes without saying that this weapon will be your best friend for the majority of the game whenever you're outdoors. There is one in CAMP MCCARRAN that you can take with no penalty. Enter Camp McCarran (it's to the southwest of the clinic, across the NCR Sharecropper's field) and go to the first open tent up ahead. Lying on the top bunk to your right is a sniper rifle. You'll need to use a couple of weapon repair kits to get it in decent condition, but what do you want for nothing? It's imperative that you buy a SUPPRESSOR for this weapon as soon as possible - one can be purchased from GUN RUNNERS. Trade your first-born if need be. Also never pass up .308 rounds at any price. Ammo type: .308
THE RATSLAYER
Silently killing enemies with guns while indoors, and without alerting other enemies to your presence is the trickiest feat to pull off in Fallout New Vegas, and presents the player intent on a stealthy experience with something of a dilemma, because there aren't that many guns in the game for use indoors that are powerful, accurate and silent - or capable of being silenced. Blasting enemies' heads off with a powerful shotgun - even though you will be alerting everyone nearby to your presence in the process - is often preferable if you have the hunting shotgun, or better still the riot shotgun. But if you're determined to continue your sniper-type sneak attacks indoors, the best option is the Ratslayer Rifle. It's equipped with a silencer and a scope (something that comes in handy more often than you might imagine when you're indoors), has decent base damage and superb Critical bonuses which this build is perfect for taking advantage of. In fact, a good case could be made for being able to complete the whole game using nothing but the Ratslayer. The only downside is that it's a bolt action weapon, and therefore takes a little longer between shots than you may like. Ammo type: 5.56mm
The Ratslayer can be found in BROC FLOWER CAVE, which is directly south of NOVAC:
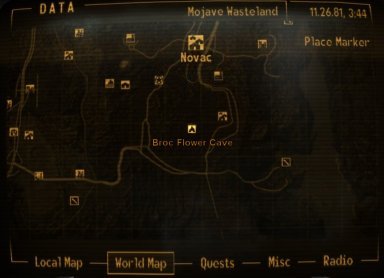
You might want to detour slightly southeast to CLARK FIELD on your way there, so that you can loot Mr. Radical's radiation suit. Watch out for the golden geckos hanging around there. From Clark Field you'll have to traverse some Legion territory, and when you arrive at Broc Flower Cave you'll find that much of it is irradiated, so remember to put on your radiation suit as soon as your Pip Boy starts to register the rads. The cave is guarded by ferocious GIANT RATS, who can take quite a bit of damage, and become frenzied when attacked, so the best way to get the Ratslayer is to sneak through using a StealthBoy. Alternatively you can try to clear the cave of it's rats if you're up for the challenge. Either way if you're successful you'll end up with a fantastic weapon, which aside from the features mentioned above also benefits from using one of the most commonly found ammo types in the game, and as it's a unique variant of the humble VARMINT RIFLE it can be repaired using any varmint rifles you pick up on your travels once you have the JURY RIGGING perk.
THE HUNTING SHOTGUN
This has a high single shot damage, DPS and magazine capacity which is ideal for those times when you're being rushed by fast enemies that can take a lot of damage before succumbing. Once you have the perks SHOTGUN SURGEON and especially AND STAY BACK the Hunting Shotgun really comes into its own. It can be modded with a LONG TUBE to increase the magazine capacity from 5 to 8, making it far superior to the likes of the single, caravan or sawed-off shotguns. In fact its ammunition capacity is second only to the awesome RIOT SHOTGUN which holds 12 rounds. You can also mod the Hunting Shotgun with a CHOKE to decrease spread, enabling it to be used in mid to long range combat, if so desired. With the Choke fitted it becomes the most accurate shotgun in the game. Ammo type: 12 Gauge
A Hunting Shotgun can be found in BOOTJACK CAVERN, which is southeast of NOVAC, just past CLARK FIELD:

You can find it on the dead prospector down the right hand branch of the cave. Beware - the whole cave is crawling with FIRE GECKOS, and they're pretty angry. The StealthBoy trick will likely not work in this cavern, so be prepared to take on a dozen or so of the little buggers. Alternatively you can always just buy a Hunting Shotgun from GUN RUNNERS, but you'll have to wait until you hit level 11. It's pricey, and the modifications are too, but you should have plenty of caps by that point. 12 Gauge shells are not as prevalent among vendors, so pick them up whenever you can.
*A Note on Weapons
There are several other weapons in the game for your consideration; the HUNTING RIFLE - which cannot be silenced, the LEVER ACTION SHOTGUN - a less powerful version of the Hunting Shotgun which uses 20 Gauge shells instead of 12 Gauge and the SILENCED .22 PISTOL - which has high critical hit chance and critical hit damage, and can be used as a 'hold-out' weapon in casinos. These are viable alternatives to the Sniper Rifle, Hunting Shotgun and Ratslayer respectively in the early game. There's also GEHENNA - a unique variant of the Shishkebab for melee combat, and SLEEPYTYME - a unique variant of the 10mm SMG which is silenced by default, and is considered an improved holdout weapon in casinos. These two weapons are very handy in the mid to late game, and are both available from Gun Runners. Also in the mid to late game (once you've maxed out your GUNS skill) you'll want to trade in your trusty Hunting Shotgun for the RIOT SHOTGUN; it's devastating at close range, and dishes out stupendous amounts of DPS as it's a semi-automatic. You can buy one from Gun Runners once you hit level 13, or you can loot one from the armory in Vault 34, which is a short jaunt southeast of Durable Dunn's Sacked Caravan:
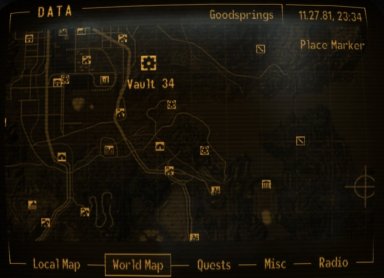
Note - It's inadvisable to tackle Vault 34 without a radiation suit, a good shotgun, and a plentiful supply of RadAway and Rad-X. You have been warned.
GENERAL TIPS
Ingredients needed to make Antivenom: 1 Nightstalker Blood, 2 Radscorpion Poison Glands (Requires SURVIVAL 40)
Ingredients needed to make Doctor's Bags: 1 Forceps, 1 Medical Brace, 1 Scalpel, 1 Surgical Tubing (Requires MEDICINE 40)
Ingredients needed to make Stimpaks: 1 Broc Flower, 1 Empty Syringe, 1 Xander Root (Requires SCIENCE 70)
Ingredients needed to make Weapon Repair Kits: 1 Duct Tape, 1 Scrap Electronics, 2 Scrap Metal, 1 Wonderglue, 1 Wrench (Requires REPAIR 50)
As a rule vendors re-stock their wares twice a week; on Wednesday and Sunday
If you hold down the Pip Boy key for a second or so it will turn on a light
If you hold down the Reload key for a second or so while a weapon is in your hand you will holster/stow it
On the PC the number keys can be assigned as hotkeys for weapons (or stimpaks). To assign them, hold down a number while in the Pip Boy 'Item' view then click what you want bound to that button. The number 2 key is reserved for switching ammo types
*Spoiler* - While he's at The Tops casino, if you kill Benny and loot his body you will get Maria - a unique and very cool 9mm variant pistol and Benny's Suit - which gives you +5 to both SPEECH and BARTER while you're wearing it. He also has the Platinum Chip on him, and having that gives you a lot more control over how things proceed later on in the main quest. |
